m (→Notes) Tag: Visual edit |
|||
| (35 intermediate revisions by 18 users not shown) | |||
| Line 1: | Line 1: | ||
| + | [[File:Skycitycard.png|300px|right]]<gallery> |
||
| ⚫ | |||
| + | Squirepose.png |
||
| ⚫ | |||
| − | It is a large aerial map surrounded by giant clouds and floating islands. |
+ | It is a large aerial map surrounded by giant clouds and floating islands. Goblin Copters spawn here on all difficulty levels, and the Goblin Battlecruiser is fought here. |
| − | The city is divided into four sections — a large central area; a small, isolated area to the north; a medium-sized area to the east; and a small area to the south. A bridge connects the southern and eastern areas. |
+ | The city is divided into four sections — a large central area; a small, isolated area to the north; a medium-sized area to the east; and a small area to the south. A bridge connects the southern and eastern areas. Both players and enemies use the numerous air lifts to reach the different areas. Red colored disposal chutes instantly plummet heroes to their death. |
| − | + | Ground enemies spawn from the central area to attack the Eternia Crystals on the north, east and south sections. |
|
==Rewards== |
==Rewards== |
||
===Costumes=== |
===Costumes=== |
||
| − | *Completing this campaign map by defeating the [[Goblin Battlecruiser]] boss will unlock a |
+ | *Completing this campaign map by defeating the [[Goblin Battlecruiser]] boss will unlock a [[Sky Captain Costume|Sky Captain]] [[costume]] for the Initiate (PC). |
===Eternia Shard=== |
===Eternia Shard=== |
||
| − | *Defeating the [[Goblin Battlecruiser]] boss will allow players to retrieve the [[Eternia Shard Recovered: Red|Red Eternia Shard]]. A trophy resembling the |
+ | *Defeating the [[Goblin Battlecruiser]] boss will allow players to retrieve the [[Eternia Shard Recovered: Red|Red Eternia Shard]]. A trophy resembling the battlecruiser's sign will appear in the player's [[tavern]]. |
| + | |||
| + | *Retrieve all four Lost Eternia Shards ([[Eternia Shard Recovered: Purple|Purple]], [[Eternia Shard Recovered: Blue|Blue]], [[Eternia Shard Recovered: Yellow|Yellow]] and [[Eternia Shard Recovered: Red|Red]]) to unlock access to the [[Crystalline Dimension]] through a tavern portal. |
||
| + | |||
| + | === Survival === |
||
| + | * [[Propeller Cat]] (Wave 25) |
||
| + | |||
| + | == Tips == |
||
| + | * If physical defenses are only built near the eastern crystal and all players stay near them, most of the enemies will path to the defenses. Regular ogres can be redirected away from the outer two crystals with very long-ranged Lightning and Deadly Striker Towers. |
||
| + | * Use a combination of only traps, auras, and beams (excluding Physical Beams) to kill any enemies attempting to attack the outer crystals. |
||
| + | * The former two tips make for a very effective strategy for Survival Mode. |
||
| + | * During the boss fight, one player should always be watching over non-minion physical defenses. The Goblin Battlecruiser's bombs can quickly demolish your team's key defenses if no one is around to repair them. |
||
| + | * For solo campaign runs, only use minions for physical defenses, since they can automatically heal themselves. You can also add Reflection Beams to reduce the amount of bombs that hit them. |
||
==Notes== |
==Notes== |
||
| + | *Yellow colored air lifts spawn around the edges of the map during the boss wave. Players can utilize these to board the deck of the [[Goblin Battlecruiser]]. |
||
| − | *The city features several air lifts (similar to [[Frostdale]]), and [[Goblin Airship]]s which air lift ogres over player defenses. |
||
| − | *[[Catarang]] |
+ | *[[Propeller Cat|Catarang]] can be found on the map as well. They behave like the [[Shroomite|Shroomites]] and Donkeys. |
==Trivia== |
==Trivia== |
||
| Line 30: | Line 44: | ||
==Media== |
==Media== |
||
<gallery type="slider"> |
<gallery type="slider"> |
||
| + | Skycitybirdseye.jpg|Sky City|link=Sky City|linktext=A Floating City in the Clouds |
||
Airship.jpg|Goblin Battlecruiser|link=Goblin Battlecruiser|linktext=The Forth and Final Boss |
Airship.jpg|Goblin Battlecruiser|link=Goblin Battlecruiser|linktext=The Forth and Final Boss |
||
| − | + | Goblincoptersteampromo.jpg|Goblin Copter|link=Goblin Copter|linktext=A New Flying Enemy Added! |
|
| − | Skycitytrailer2.jpg|Goblin Copter|link=Goblin Copter|linktext=A New Flying Enemy Added! |
||
Skycitypromo4.png|Red Eternia Shard|link=Eternia Shard Recovered: Red|linktext=Obtain the Red Eternia Shard! |
Skycitypromo4.png|Red Eternia Shard|link=Eternia Shard Recovered: Red|linktext=Obtain the Red Eternia Shard! |
||
</gallery> |
</gallery> |
||
| ⚫ | |||
| − | |||
| ⚫ | |||
| − | ==Map Details== |
||
| ⚫ | |||
| − | {{Template:Map Information Rewards |
||
| − | |crystals = 3 |
||
| − | |waves = 12 |
||
| − | |defense units = 170 |
||
| − | |starting mana = 700 |
||
| − | |mana per round = ? |
||
| − | |goblin = . |
||
| − | |dark elf archer = . |
||
| − | |orc = . |
||
| − | |kobold = . |
||
| − | |wyvern = . |
||
| − | |dark elf mage = . |
||
| − | |dark elf warrior = . |
||
| − | |goblin copter = . |
||
| − | |ogre = . |
||
| − | |hazards = Falling Off Map |
||
| − | |challenge = Boss Rush |
||
| − | |survival reward = Catarang|apprentice easy = [[Gargoyle Staff]]|squire medium = [[Cog Sword]]|monk medium = [[Clockwork Spear]]|squire easy = [[Cog Sword]] |
||
| − | |huntress easy = [[The Grasser]] |
||
| − | |apprentice medium = [[Gargoyle Staff]] |
||
| − | |squire hard = [[Cog Sword]] |
||
| − | |apprentice hard = [[Gargoyle Staff]]|monk easy = [[Clockwork Spear]] |
||
| − | |huntress medium = [[The Grasser]] |
||
| − | |huntress hard = [[The Grasser]] |
||
| − | |monk hard = [[Clockwork Spear]] |
||
| − | |squire insane = [[Steam Saw]] |
||
| − | |apprentice insane = [[Staffaphone]] |
||
| − | |huntress insane = [[Krytykal Stryke]] |
||
| − | |monk insane = [[Monk Wrench]] |
||
| − | |squire nightmare = [[Steam Saw]] |
||
| − | |apprentice nightmare = [[Staffaphone]] |
||
| − | |huntress nightmare = [[Krytykal Stryke]] |
||
| − | |monk nightmare = [[Monk Wrench]]|goblin battlecruiser = .|image = skycity.png}} |
||
| ⚫ | |||
| ⚫ | |||
| ⚫ | |||
| − | [[Category:Quest for the Lost Eternia Shards]] |
||
Revision as of 17:10, 8 June 2020
")
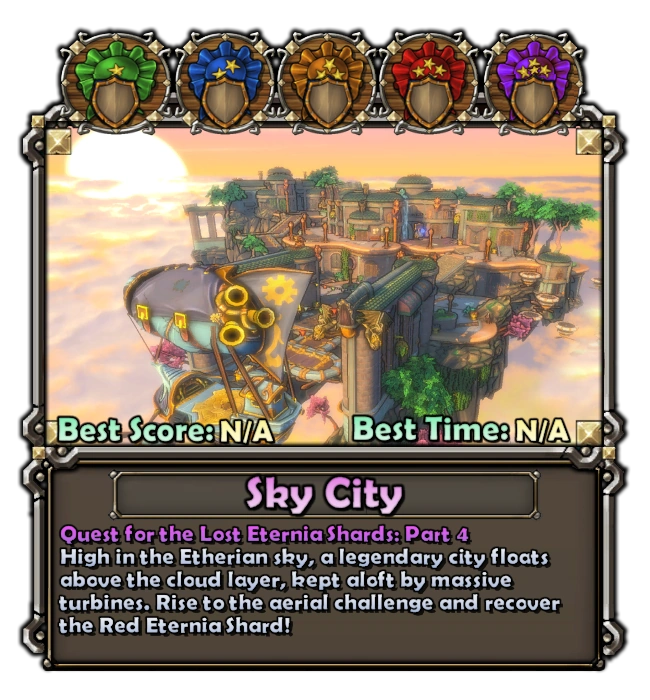
The Sky City is the location of the fourth and last part of the Quest for the Lost Eternia Shards series, the Part 4: Sky City DLC.
It is a large aerial map surrounded by giant clouds and floating islands. Goblin Copters spawn here on all difficulty levels, and the Goblin Battlecruiser is fought here.
The city is divided into four sections — a large central area; a small, isolated area to the north; a medium-sized area to the east; and a small area to the south. A bridge connects the southern and eastern areas. Both players and enemies use the numerous air lifts to reach the different areas. Red colored disposal chutes instantly plummet heroes to their death.
Ground enemies spawn from the central area to attack the Eternia Crystals on the north, east and south sections.
Rewards
Costumes
- Completing this campaign map by defeating the Goblin Battlecruiser boss will unlock a Sky Captain costume for the Initiate (PC).
Eternia Shard
- Defeating the Goblin Battlecruiser boss will allow players to retrieve the Red Eternia Shard. A trophy resembling the battlecruiser's sign will appear in the player's tavern.
- Retrieve all four Lost Eternia Shards (Purple, Blue, Yellow and Red) to unlock access to the Crystalline Dimension through a tavern portal.
Survival
- Propeller Cat (Wave 25)
Tips
- If physical defenses are only built near the eastern crystal and all players stay near them, most of the enemies will path to the defenses. Regular ogres can be redirected away from the outer two crystals with very long-ranged Lightning and Deadly Striker Towers.
- Use a combination of only traps, auras, and beams (excluding Physical Beams) to kill any enemies attempting to attack the outer crystals.
- The former two tips make for a very effective strategy for Survival Mode.
- During the boss fight, one player should always be watching over non-minion physical defenses. The Goblin Battlecruiser's bombs can quickly demolish your team's key defenses if no one is around to repair them.
- For solo campaign runs, only use minions for physical defenses, since they can automatically heal themselves. You can also add Reflection Beams to reduce the amount of bombs that hit them.
Notes
- Yellow colored air lifts spawn around the edges of the map during the boss wave. Players can utilize these to board the deck of the Goblin Battlecruiser.
- Catarang can be found on the map as well. They behave like the Shroomites and Donkeys.
Trivia
- Sky City is the homeworld of the Series EV.
- An Eternia Crystal Skin is named after this location.
Usage Guide

Media


