No edit summary |
m (Falling off ledges is not a hazard on this map.) |
||
| Line 12: | Line 12: | ||
Stand on the rear right crystal and face the left crystal. Equip an [[Apprentice Animus]] to cover the left crystal's Kobolds. |
Stand on the rear right crystal and face the left crystal. Equip an [[Apprentice Animus]] to cover the left crystal's Kobolds. |
||
| − | Play in first person, and aim your staff |
+ | Play in first person, and aim your staff precisely as pictured. Going from left to right, your 1st and 6th projectiles should cover the stairs, your 2nd and 5th projectiles should hit the two red pillars, and your inner 3rd and 4th projectiles should fire just adjacent to the crystal itself. If your inner 3rd and 4th projectiles are not killing the 'inner lane' Kobolds before they hit the crystal, then slightly move further back on top of your crystal to increase the spread. |
| − | <br /> |
||
===Notes=== |
===Notes=== |
||
| − | You must be able to deal sufficient damage to kill the |
+ | You must be able to deal sufficient damage to kill the Kobolds on nightmare difficulty in one shot, or most likely you will fail on the later waves. Remember that on this difficulty, your crystal can only take 5 direct Kobolds hits. |
If properly geared for nightmare, this strategy will easily work for easier difficulties! |
If properly geared for nightmare, this strategy will easily work for easier difficulties! |
||
| Line 29: | Line 28: | ||
|crystals = 2 |
|crystals = 2 |
||
|waves = 8 |
|waves = 8 |
||
| − | |hazards = |
+ | |hazards = |
|defense units = 0 |
|defense units = 0 |
||
|starting mana = 350 |
|starting mana = 350 |
||
Revision as of 21:49, 31 May 2012

Zippy Terror is a challenge set in the Hall of Court. All waves consist entirely of Kobolds. Players have zero Defense Units available, so towers, traps, and auras cannot be used.
In later waves they light their fuses almost immediately upon sighting the crystal. This challenge is easiest with huntresses or apprentices, since they have ranged attacks and the huntress can kill Kobolds fairly easy with piercing shot. If using 3 or more players (as recommended), place two players on the front stairs and one/two at the back stairs.
A preferred weapon for the Huntress is the Crystal Tracker (or similar Ray Gun). The wide area of effect and neutral damage is very effective at clearing masses of low health mobs like these Kobolds.
Nightmare Solo Strategy

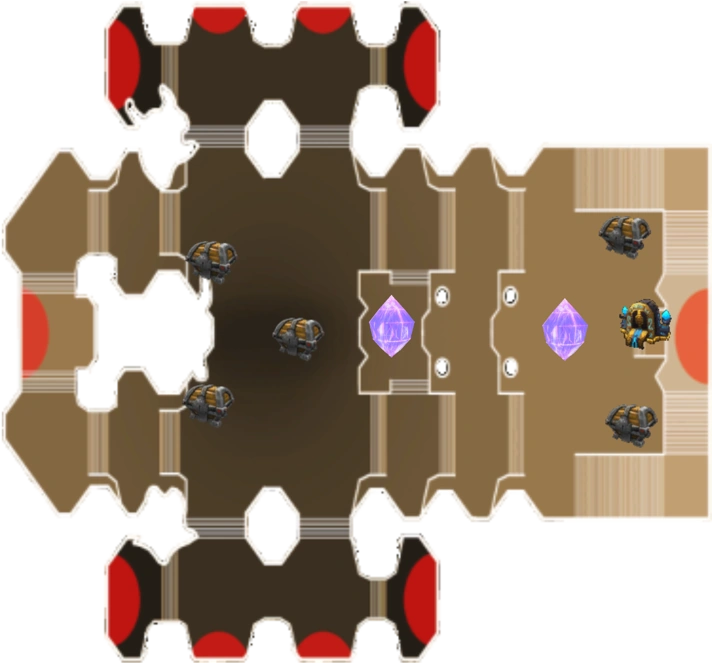
Proper staff positioning when standing on the right crystal. Note how this staff fires all 6 projectiles in a flat plane. Note how the two outer projectiles cover the stairs, and the two inner projectiles cover the crystal.
Contrary to popular belief, it is possible to solo Zippy Terror. Play as an apprentice with a special staff which fires all 6 projectiles in a single flat plane (e.g. The North Pole), as opposed to firing 5 projectiles in a flat plane with the 6th firing above the center like most staves.
Stand on the rear right crystal and face the left crystal. Equip an Apprentice Animus to cover the left crystal's Kobolds.
Play in first person, and aim your staff precisely as pictured. Going from left to right, your 1st and 6th projectiles should cover the stairs, your 2nd and 5th projectiles should hit the two red pillars, and your inner 3rd and 4th projectiles should fire just adjacent to the crystal itself. If your inner 3rd and 4th projectiles are not killing the 'inner lane' Kobolds before they hit the crystal, then slightly move further back on top of your crystal to increase the spread.
Notes
You must be able to deal sufficient damage to kill the Kobolds on nightmare difficulty in one shot, or most likely you will fail on the later waves. Remember that on this difficulty, your crystal can only take 5 direct Kobolds hits.
If properly geared for nightmare, this strategy will easily work for easier difficulties!
Related Achievements
- Speed Freak - Completed Zippy Terror on >= Medium Difficulty
- Kobold Exterminator - Completed Zippy Terror on Insane Difficulty
| Recommended Level: 25 | Challenge Information | |||||||||||||||||||||||||||||
|---|---|---|---|---|---|---|---|---|---|---|---|---|---|---|---|---|---|---|---|---|---|---|---|---|---|---|---|---|---|---|
 | ||||||||||||||||||||||||||||||
| Number of Crystals | Number of Waves | |||||||||||||||||||||||||||||
| 8 | ||||||||||||||||||||||||||||||
| Defense Units | Starting Mana | |||||||||||||||||||||||||||||
| 0 | 350 | |||||||||||||||||||||||||||||
| Hazards | Mana Per Round | |||||||||||||||||||||||||||||
| None | 280 | |||||||||||||||||||||||||||||
| Spawn List | ||||||||||||||||||||||||||||||
Template:Map information/EnemyTemplate:Map information/EnemyTemplate:Map information/EnemyTemplate:Map information/EnemyTemplate:Map information/EnemyTemplate:Map information/EnemyTemplate:Map information/EnemyTemplate:Map information/EnemyTemplate:Map information/EnemyTemplate:Map information/EnemyTemplate:Map information/EnemyTemplate:Map information/Enemy
| ||||||||||||||||||||||||||||||